Wednesday, December 17, 2014
INE's Cisco Mega Show Commands
I discovered these commands while watching a YouTube video on the CCIE R&S Lab and thought they would be of great use during the troubleshooting portion of the lab and in everyday troubleshooting.
1. Show IP Protocols Summary - shows all IP routing processes on the router
router#show ip protocols summary
Index Process Name
0 connected
1 static
2 BGP 64000
2. Show run | i access-list|class-map|policy-map|security|shutdown|control-plane - displays a key list of information from the router's configuration
router#sho run | i access-list|class-map|policy-map|security|shutdown|control-plane
class-map match-any Gold
class-map match-any AF4
class-map match-any AF3
class-map match-any AF2
policy-map BEST
shutdown
ip access-list extended MY-NETWORK-ACCESS
access-list 101 permit ip host 192.168.0.20 any
access-list 140 permit udp any any tos 5
snmp-server system-shutdown
3. Ping 255.255.255.255 - pings all next-hop addresses on the router, great for checking connectivity
router#ping 255.255.255.255
Reply to request 0 from 192.168.1.2, 4 ms
Reply to request 0 from 32.151.189.27, 36 ms
Reply to request 1 from 192.168.1.2, 1 ms
Reply to request 1 from 32.151.189.27, 16 ms
Reply to request 2 from 192.168.1.2, 1 ms
Reply to request 2 from 32.151.189.27, 16 ms
Reply to request 3 from 192.168.1.2, 1 ms
Reply to request 3 from 32.151.189.27, 80 ms
Reply to request 4 from 192.168.1.2, 1 ms
Reply to request 4 from 32.151.189.27, 48 ms
Friday, November 21, 2014
VMware Fusion 7 Crashes on Startup
Today I discovered that Fusion may not start if you are behind an Internet proxy and Fusion is unable to check for updates, which is the default setting. Sadly, this took me about a half-hour to figure out, when I was trying to startup Fusion to get my work PC up and running. The Fusion window would start to appear and then just disappear. I deleted Fusion, re-installed it, but experienced the same results, because by default Fusion checks for updates upon starting up and I was behind an Internet proxy (corporate office). Being used to working remotely with no proxy involved, this made the situation very confusing, since when I typically go into the office, Fusion is already running.
To avoid this behavior, go to VMware Fusion > Preferences and un-check Automatically check for updates or get out from behind the internet proxy until Fusion has started.
 I discovered the source of this issue in this post on the VMware Community forum.
To avoid this behavior, go to VMware Fusion > Preferences and un-check Automatically check for updates or get out from behind the internet proxy until Fusion has started.
Thursday, November 20, 2014
VMware Fusion 7 Copy & Paste, Drag & Drop, and Unity Issue
I use a client's Windows 7 laptop as my work PC that I long ago P2V'd into a Parallels 8 VM. All was going right in the world when I decided that with the introduction of VMware Fusion 7 Pro's ability to access ESXi hosts, like the non-existant VMware client for MAC, this would be my new hypervisor of choice. I knew of Fusion's (or Windows 7) lack of USB 3.0 support, but I figured I could live without it as long I could copy & paste between guest and host. After a messy "import" of my Parallels VM to Fusion, I was able to finally sort everything out except the following:

- Copy & paste did not work
- Drag & drop did not work
- Unity was not working
After following the advice in KB1014988 and KB1027884, the issues still persisted and I finally opened a ticket with VMware. After spending a couple of hours on a WebEx with VMware support, they finally discovered a solution. User Account Control (UAC) was preventing this functionality. After dropping it to "Never notify" and rebooting, Unity was enabled and I was able to copy & paste and drag & drop between the guest and host.
You can perform this fix by going to Control Panel > User Accounts > Change User Account Control settings and setting the slider bar to the bottom setting of Never notify. After updating this setting, reboot for the change to take effect.
After the issue was resolved, and I had a better idea as to what was causing the issue, I came across KB1019058 which addresses the issue of Unity and UAC. I was also informed that Windows Firewall could also cause issues with Unity, but that was not my case.
Thursday, October 16, 2014
OS X Yosemite USB Install
Here's a simple way to create a USB install disk for OS X Yosemite!
First, download Yosemite from the app store, then format your 8GB+ USB drive in Mac OS Extended (Journaled) format. I'll be using a Lexar P10 USB 3 32GB drive in this example (I highly recommend a USB 3 drive for this install)

Second, run the following command below in the terminal to create the install USB drive. This assumes that the Yosemite installer is in your Applications folder and that your USB drive is labelled Untitled.
sudo /Applications/Install\ OS\ X\ Yosemite.app/Contents/Resources/createinstallmedia --volume /Volumes/Untitled --applicationpath /Applications/Install\ OS\ X\ Yosemite.app --nointeraction

Your USB drive should now be labeled "Install OS X Yosemite". To boot from this drive, hold down the Option key when booting your Mac and select the USB drive.
First, download Yosemite from the app store, then format your 8GB+ USB drive in Mac OS Extended (Journaled) format. I'll be using a Lexar P10 USB 3 32GB drive in this example (I highly recommend a USB 3 drive for this install)
Second, run the following command below in the terminal to create the install USB drive. This assumes that the Yosemite installer is in your Applications folder and that your USB drive is labelled Untitled.
sudo /Applications/Install\ OS\ X\ Yosemite.app/Contents/Resources/createinstallmedia --volume /Volumes/Untitled --applicationpath /Applications/Install\ OS\ X\ Yosemite.app --nointeraction
Monday, October 13, 2014
Dropcam over PoE (sort of)
I was looking to replace my Samsung SNV-7080R locate at my front door with something that I could more easily access remotely and record from. The 7080R had a built in SD card for edge recording, but I had no remote access to the camera when away from home without setting up as VPN or public recording server.
Ideally, I wanted to setup a Dropcam in it's place, but I couldn't find a cheap way to power it since it would be located in the ceiling. I had already run CAT5e to the location since the 7080R was a PoE camera. After a few weeks of searching, I came across this product from WiFi-Texas.com. This USB over Ethernet device is great for iPads and other devices that require power from USB. The only issue that I have with it is that it's not 802.1af compliant, so I have to use their 24v power adapter instead of my PoE 48v switch.
Parts:
Basic setup

Dropcam charger and PoE charger

Dropcam installed

Attic view of cabling


I've had this installed for two months now and have to say it's a much better solution than the 7080R it has replaced. I have not had any issues with the camera and it's great to be able to check it from my phone and web browser. Now that I have the ability to power these over Ethernet, I will definitely be adding a few more in the future!
Ideally, I wanted to setup a Dropcam in it's place, but I couldn't find a cheap way to power it since it would be located in the ceiling. I had already run CAT5e to the location since the 7080R was a PoE camera. After a few weeks of searching, I came across this product from WiFi-Texas.com. This USB over Ethernet device is great for iPads and other devices that require power from USB. The only issue that I have with it is that it's not 802.1af compliant, so I have to use their 24v power adapter instead of my PoE 48v switch.
Parts:
- Dropcam Pro
- WS-POE-5v10w w/ power adapter & USB adapter ($25 eBay)
- Ethernet cable CAT5e/CAT6
- USB Cable
Dropcam installed
Attic view of cabling
View from camera
IKEA BEKANT Sit/Stand Desk
Recently, IKEA came out with a new desk series under the name BEKANT. I assume this will be replacing the GALANT series of desks, as some of them seem to no longer be available on the website. This comes at a great time as I'm currently shopping for a sit/stand desk. After looking at desks from Steelcase and HumanScale, what I really wanted want to have my current GALANT desk in a sit/stand configuration. The IKEA fairy must have heard my wish, because that is what the new BEKANT desk is. So, as soon as this was available at my local IKEA, I rushed out and purchased one.


Previous office with GALANT desk
New BEKANT desk
The desk has electronic height control which is essentially an up and down button. It's range is 22" - 48" which is sufficient for me at 6'0". I also like the new white base (also comes in black) verses the old silver base on the GALANT. The next step will be to add a monitor arm to raise the monitor up to eye level.
Friday, August 29, 2014
Remotely Change IP on Cisco Router/Switch
A project I was working on required an IP address update for a remote site. Usually, the protocol would be to call out a local tech and have them console into the device and either update the configuration or I would RDP into their machine and complete the same task. This works great, but costs money for an on-site visit. I figured there must be a way to perform this remotely and save a little cash in the process.
Most Cisco routers and switches allow you to upload a .txt file to local storage, usually Flash:, with which you can copy the contents of the .txt to the running-config. The beauty of this method is that the commands in the .txt are run from the local CLI and not a VTY line. This will allow you to update an IP address completely as compared to being disconnected half-way through.
In the example below, I'll demonstrate how to change the IP address and default gateway on a switch:
1. Create a .txt file with the commands you wish to run, e.g. Change01.txt
interface vlan1
no ip address 192.168.0.2 255.255.255.0
ip address 10.0.0.2 255.255.255.0
!
no ip default-gateway 192.168.0.1
ip default-gateway 10.0.0.1
!
2. Upload the .txt file to the switch
copy tftp://192.168.0.10/Change01.txt Flash:/Change01.txt
3. Important! As a precaution, since you will be performing this remotely, set the switch to automatically reload in case something does not go correctly. You can cancel the scheduled reload afterwards if everything goes as planned. The command below will automatically reload the switch in 15 minutes if not cancelled.
reload in 15
4. Copy the changes in the .txt file to the running-config
copy Flash:/Change01.txt running-config
5. At this point your remote session to the switch will drop and you'll need to establish a new session to the switch with the new address. If you are able to remote to the switch with the new IP and accept the changes, then you can cancel the reload and save your changes.
reload cancel
copy running-config startup-config
6. Optional - If your changes did not go as planned and you're locked out or unable to remote back in, don't fret, the switch will automatically reload at the end of the timer you configured in step 3 and the original configuration will be loaded.
Wednesday, May 21, 2014
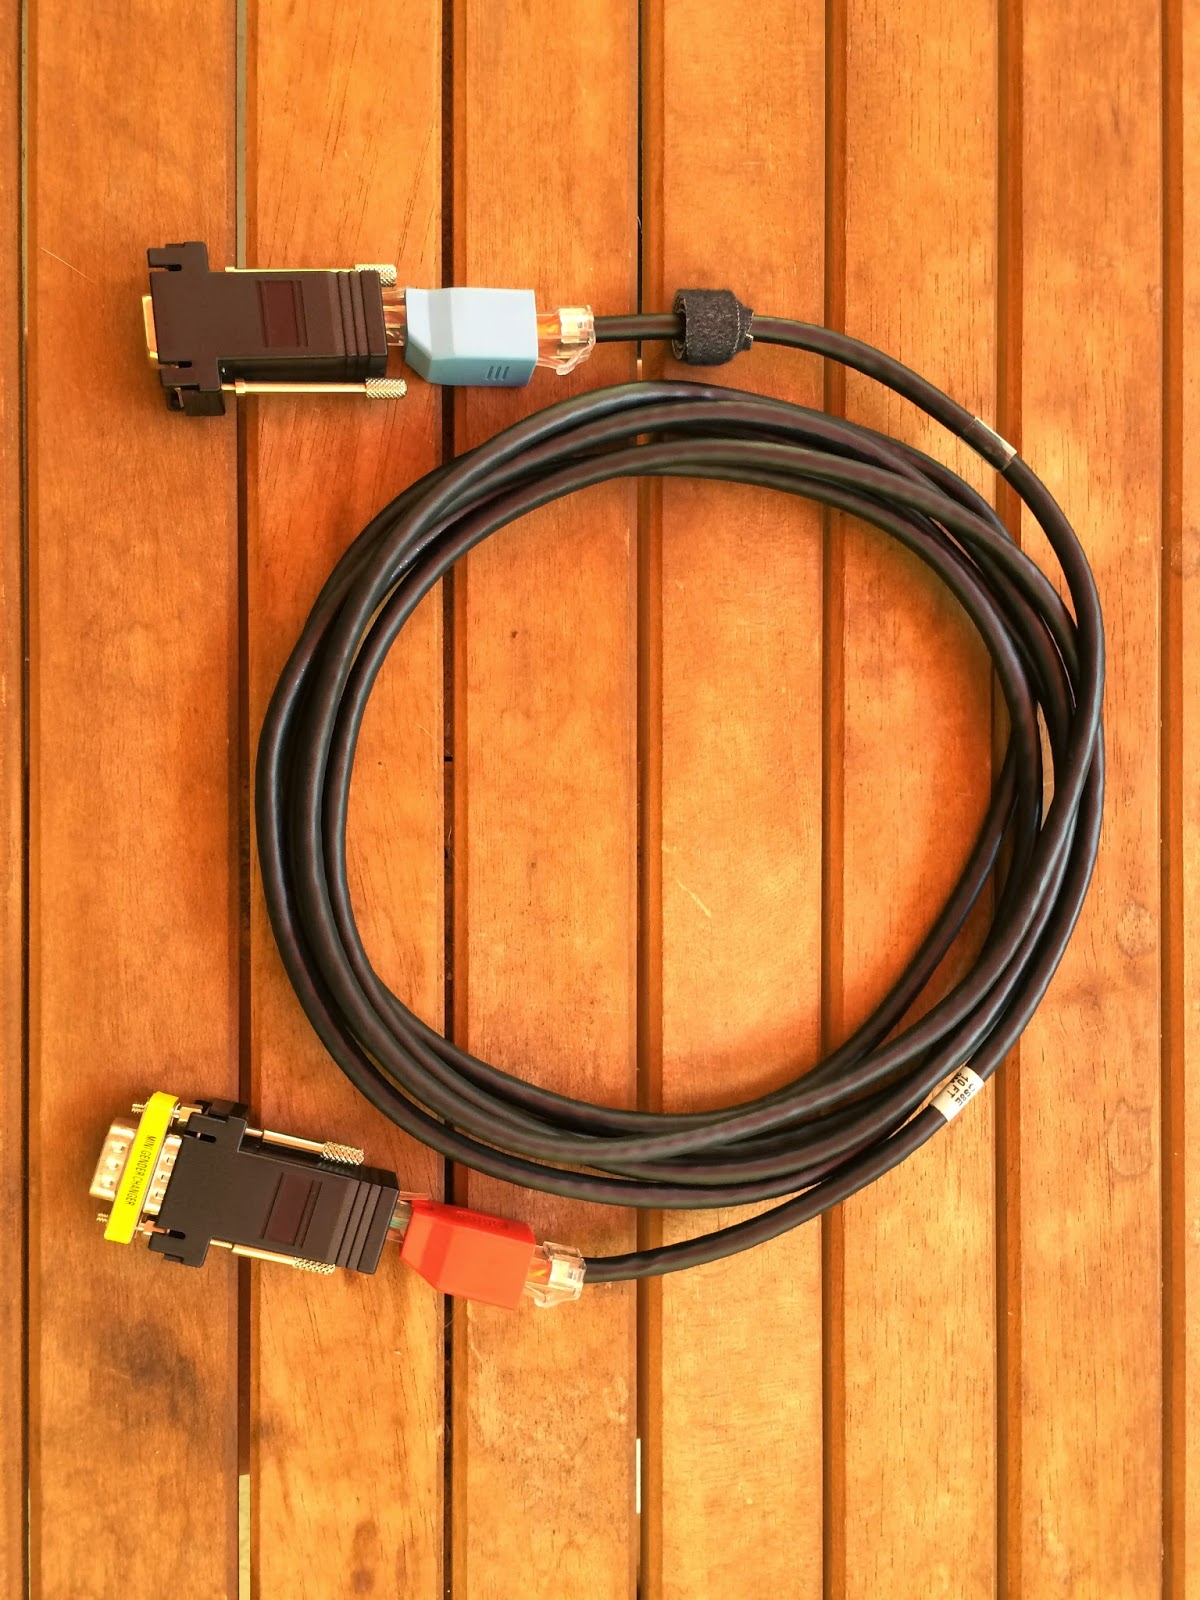
X-in-1 Network Admin's Cable
Based on Michael Ossmann's 5-in-1 Network Admin's Cable, I decided to create my own version with a few upgrades/updates.
Here are the components I selected:
I chose the FT232R chipset due to it's excellent driver support in Windows and OS X.
Here are some of the most common configurations:
Here are the components I selected:
- Cat 6 Network Cable
- StarTech Cisco Console Rollover Adapter
- StarTech Gigabit Cat 6 to Crossover Ethernet Adapter
- (2) StarTech DB9 to RJ45 Modular Adapter - F/F
- FT232R USB UART USB-to-Serial Adapter
I chose the FT232R chipset due to it's excellent driver support in Windows and OS X.
Here are some of the most common configurations:
Stored Configuration
 Cisco Console Cable
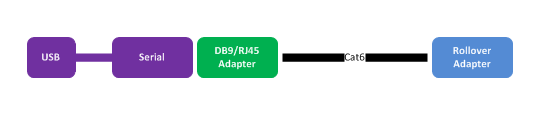


Null Modem Cable
Crossover Cable
USB-to-DB9 Console Cable
Subscribe to:
Posts (Atom)